Introduction The Thigh Fat
Thigh fat is a common concern for many people, particularly women. It refers to the accumulation of excess fat in the thigh area, which can affect the shape and appearance of the legs. While some fat is necessary for overall health, excess thigh fat can be frustrating and challenging to lose.
This is due to a combination of factors, including hormonal influences, genetics, and lifestyle choices. Hormones, especially estrogen, promote fat storage in the lower body, making it more prevalent in women. Genetics determine how and where our bodies store fat, and for many, the thighs are a primary storage site. Additionally, lifestyle factors such as diet, physical activity levels, stress, and sleep patterns play significant roles in the accumulation of thigh fat.
Understanding the nature of thigh fat, its causes, and effective strategies for reducing it can help you achieve your fitness and body shape goals. Exercises for losing Thigh Fat at home.
Understanding Thigh Fat
Why Thigh Fat Accumulates
Thigh fat is a common concern, especially among women, due to hormonal influences that promote fat storage in the lower body. Factors such as poor diet, lack of physical activity, and genetics also contribute to thigh fat accumulation.
The Role of Genetics and Hormones
Genetics play a significant role in determining where your body stores fat. Hormones, particularly estrogen, can lead to fat being stored in the thighs. Understanding these factors can help in devising a more effective plan to target thigh fat.
what exercises are best for losing thigh fat
Include Best Exercises for losing Thigh Fat as Sumo Squat, Forward Lunges, Side Lunges, Jumping Jacks ,Burpees ,Air Cycling and Side-Lying Adduction . The key to strengthening the legs without bulking up is to keep the reps high (at least 15 reps per set). Perform three rounds of each exercise with minimal rest between each movement.
Sumo Squat
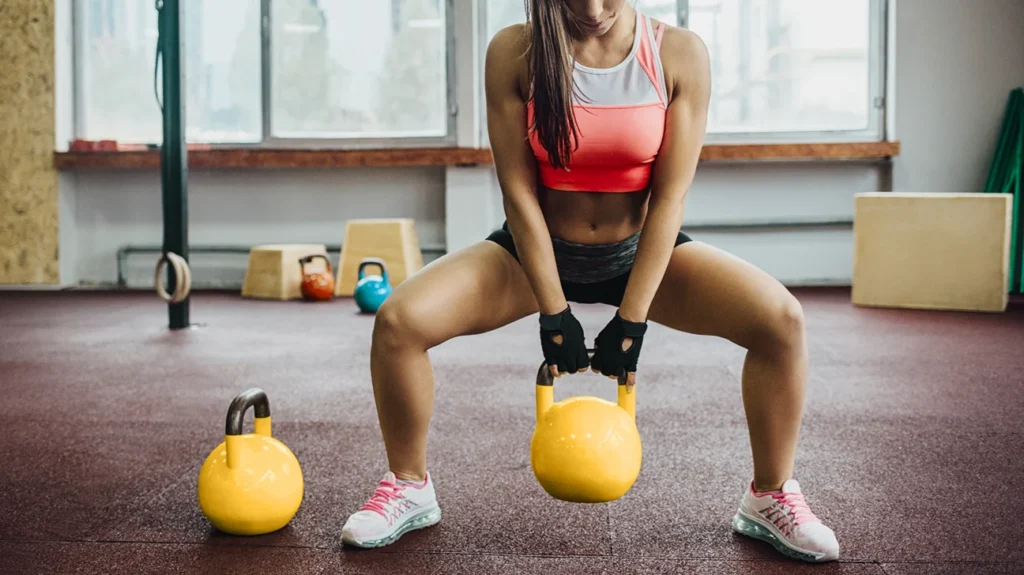
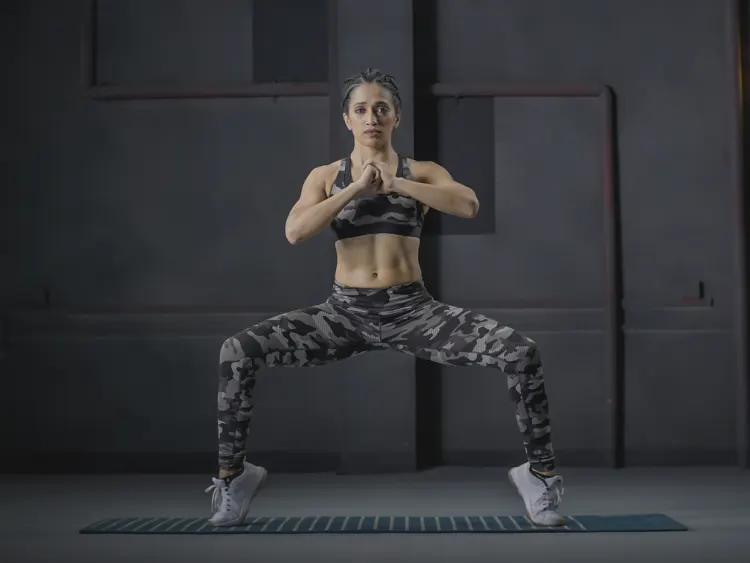
The sumo squat is a Best Exercises for losing Thigh Fat that targets the inner thigh fat removal, glutes, and quadriceps. Unlike the traditional squat, the sumo squat involves a wider stance and toes pointed out, which emphasizes different muscle groups. Here’s how to perform a sumo squat correctly:
sumo squats into your workout routine can help you build strength and muscle in your thighs and glutes, contributing to overall lower body strength and endurance.
How to Perform a Sumo Squat
- Starting Position:
- Stand with your feet wider than shoulder-width apart.
- Point your toes outward at a 45-degree angle. The wider stance helps in targeting the inner thighs.
- Keep your back straight, shoulders relaxed, and chest lifted.
- Hand Placement:
- Place your hands on your hips, extend them straight out in front of you, or hold them together at your chest.
- If using weights, hold a dumbbell or kettlebell with both hands in front of you, letting it hang between your legs.
- Lowering Phase:
- Engage your core muscles and start bending your knees, pushing your hips back as if sitting into a chair.
- Lower your body until your thighs are parallel to the floor or as low as you can go while maintaining proper form.
- Keep your knees aligned with your toes and avoid letting them collapse inward.
- Lifting Phase:
- Press through your heels to straighten your legs and return to the starting position.
- Squeeze your glutes and inner thighs as you stand up to fully engage the muscles.
- Repetition:
- Perform 3 sets of 12-15 reps. Adjust the number of sets and reps according to your fitness level and goals.
Tips for Proper Form
- Maintain a Straight Back: Keep your chest up and your back straight throughout the movement to avoid injury.
- Engage Your Core: Tighten your abdominal muscles to support your lower back and improve stability.
- Controlled Movement: Lower yourself slowly and with control. Avoid using momentum to complete the squat.
Benefits of Sumo Squats
- Strengthens inner thighs and reduce thigh fat.
- Activates abductors in your inner thighs.
- Helps in improving core strength.
- Enhances movement, balance, and coordination in the body.
Common Mistakes to Avoid
- Narrow Stance: Ensure your feet are wide enough to effectively target the inner thighs. A narrow stance can diminish the effectiveness of the exercise.
- Rounded Back: Keep your back straight and avoid leaning forward excessively.
- Knees Caving In: Focus on keeping your knees aligned with your toes to protect your joints and maximize muscle engagement.
Forward Lunges
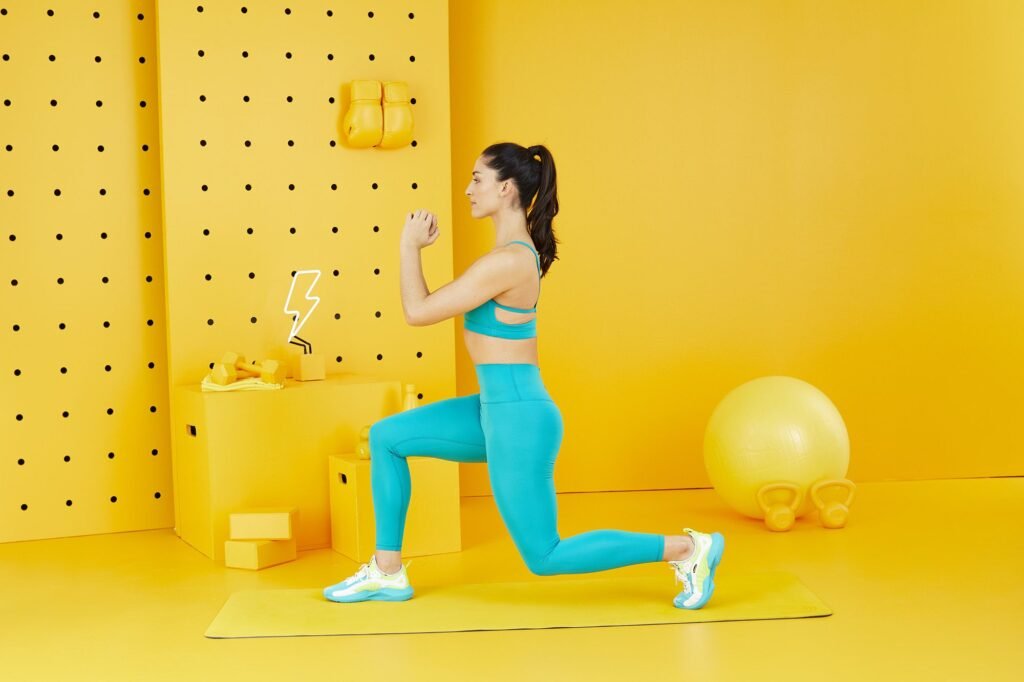
Forward lunges are an effective thigh slimming exercises that targets the quadriceps, hamstrings, glutes, and calves. This exercise also losing Thigh Fat ,improves balance and coordination. Here’s how to perform forward lunges correctly: This is a perfect Exercises for losing Thigh easily at home..
How to Perform a Forward Lunge
- Starting Position:
- Stand upright with your feet hip-width apart.
- Keep your shoulders back, chest lifted, and core engaged.
- Step Forward:
- Take a large step forward with your right foot, landing on your heel first.
- Ensure your knee is directly over your ankle, not extending beyond your toes.
- Lowering Phase:
- Bend both knees to lower your body toward the ground.
- Your right thigh should be parallel to the floor, and your left knee should hover just above the ground.
- Keep your torso upright and avoid leaning forward.
- Returning Phase:
- Push through your right heel to return to the starting position.
- Bring your right foot back to meet your left foot, standing upright.
- Repetition:
- Perform 3 sets of 12-15 reps on each leg. Adjust the number of sets and reps based on your fitness level.
Tips for Proper Form
- Keep Your Back Straight: Maintain an upright posture throughout the movement to avoid straining your lower back.
- Engage Your Core: Tighten your abdominal muscles to help stabilize your body and support your lower back.
- Controlled Movement: Lower yourself slowly and with control. Avoid letting your knee move too far past your toes.
Common Mistakes to Avoid
- Knee Over Toes: Ensure that your front knee stays aligned over your ankle and doesn’t extend past your toes to avoid strain on your knee joint.
- Leaning Forward: Keep your torso upright and avoid leaning forward excessively. This helps maintain balance and proper form.
- Shallow Lunge: Make sure to lower your body enough so that your front thigh is parallel to the floor for maximum effectiveness.
Benefits of Forward Lunges
- Stabilizes your thigh muscles.
- Improves hip flexibility.
- Provides better body balance.
- Lightens up the glute muscles, thereby toning the butt.
Side Lunges
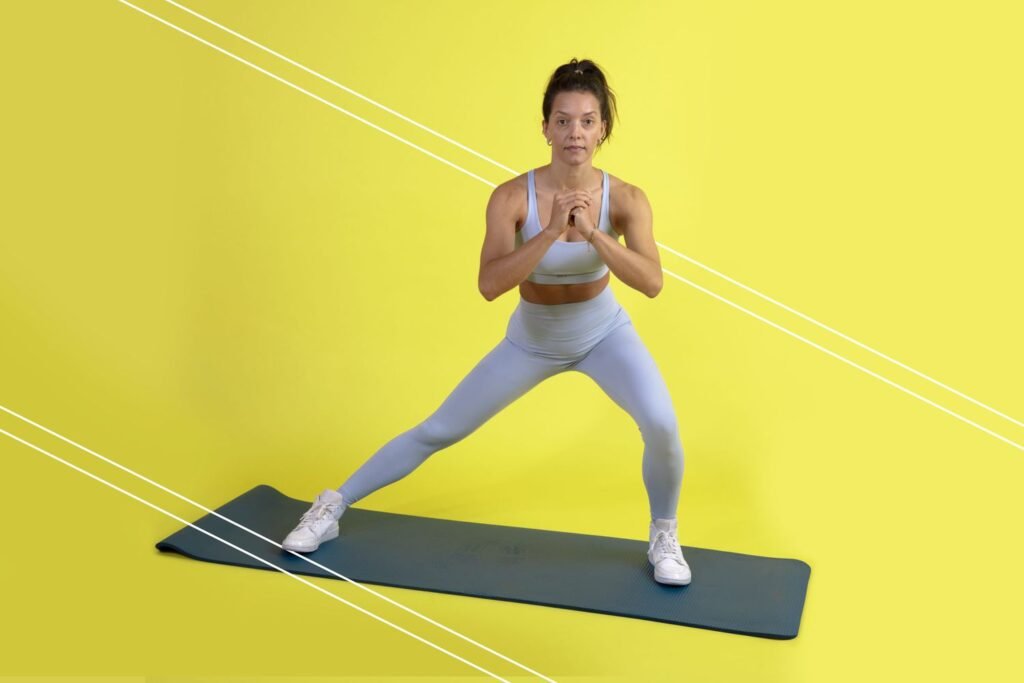
Side lunges are a versatile leg fat removal exercise that targets the inner and outer thighs, glutes, and quads. Unlike forward lunges, side lunges focus on lateral movement, helping to improve hip flexibility and strengthen the muscles around the hips and thighs. This is Exercises help for losing Thigh Fat Here’s how to perform side lunges correctly and the benefits they offer:
How to Perform a Side Lunge
- Starting Position:
- Stand upright with your feet hip-width apart.
- Keep your back straight, shoulders relaxed, and chest lifted.
- Step to the Side:
- Take a wide step to the right with your right foot.
- Keep your left leg straight as you shift your weight onto your right leg.
- Lowering Phase:
- Bend your right knee and push your hips back as you lower your body toward the ground.
- Your right thigh should be parallel to the floor, while your left leg remains straight.
- Ensure your right knee is aligned with your toes and does not extend past your toes.
- Returning Phase:
- Push through your right heel to return to the starting position.
- Bring your right foot back to meet your left foot, standing upright.
- Repetition:
- Perform 3 sets of 12-15 reps on each side. Adjust the number of sets and reps according to your fitness level.
Benefits of Side Lunges
- Helps to develop stability and strength in the body.
- Reduces both inner and outer thigh fat.
- Helps in decreasing cellulite.
- Improves overall mobility of the hip.
- Can be performed by people with knee pain who might find the forward lunge challenging
Tips for Proper Form
- Maintain a Straight Back: Keep your torso upright and avoid leaning forward. This helps prevent strain on your lower back.
- Engage Your Core: Tighten your abdominal muscles to support your lower back and help maintain balance.
- Controlled Movement: Lower your body slowly and with control to maximize the effectiveness of the exercise and prevent injury.
Common Mistakes to Avoid
- Knee Alignment: Ensure your bent knee is aligned with your toes and does not collapse inward. This helps protect your knee joint and maximize muscle engagement.
- Leaning Forward: Avoid leaning your torso forward excessively. Keep your back straight and your chest up to maintain proper form.
- Shallow Lunge: Lower yourself far enough so that your thigh is parallel to the ground to fully engage the muscles.
Variations and Progressions
- Curtsy Lunges: Step your right leg behind your left leg into a curtsy position. This variation targets the glutes and inner thighs differently.
- Side Lunge with Weights: Hold dumbbells or a barbell to increase resistance and challenge your muscles further.
- Side Lunge to Knee Lift: After returning to the starting position, lift your right knee toward your chest. This adds a balance component and increases intensity.
Jumping Jacks
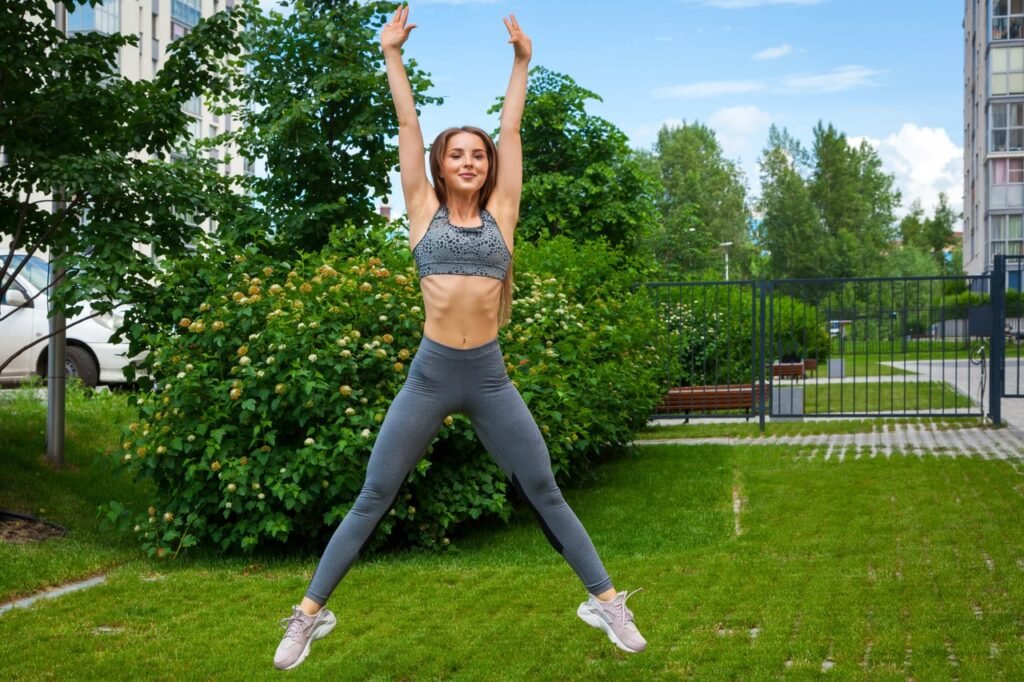
Jumping jacks are a classic cardiovascular exercise that provides a full-body workout and helps improve cardiovascular fitness, coordination, and Exercises for losing Thigh Fat. This simple yet effective exercise can be performed anywhere and requires no special equipment. Here’s how to do jumping jacks correctly and their benefits:
How to Perform Jumping Jacks
- Starting Position:
- Stand upright with your feet together and arms by your sides.
- Keep your back straight, shoulders relaxed, and core engaged.
- Jumping Phase:
- Jump your feet out to the sides while simultaneously raising your arms above your head.
- Ensure your arms are fully extended and your hands are reaching toward each other at the top of the jump.
- Returning Phase:
- Jump your feet back together while lowering your arms to your sides.
- Return to the starting position with a smooth and controlled motion.
- Repetition:
- Perform 3 sets of 30-60 seconds of continuous jumping jacks. Adjust the duration and number of sets based on your fitness level.
Benefits of Jumping Jacks
- Improves Cardiovascular Health: Elevates heart rate and boosts cardiovascular endurance.
- Enhances Coordination: Requires coordination between arms and legs, improving overall motor skills.
- Increases Calorie Burn: Effective for burning calories and supporting weight loss.
- Strengthens Muscles: Engages multiple muscle groups including legs, arms, and core.
- Boosts Energy Levels: Increases blood flow and oxygen delivery, reducing fatigue.
- Improves Flexibility: Stretches and lengthens muscles, promoting better flexibility.
Tips for Proper Form
- Maintain a Straight Posture: Keep your back straight and core engaged.
- Land Lightly: Use the balls of your feet to reduce joint impact.
- Controlled Movement: Perform each jump with control and proper extension.
Common Mistakes to Avoid
- Overextending Jumps: Avoid excessive width or height.
- Slouching or Leaning Forward: Keep your torso upright.
- Inconsistent Arm Movement: Ensure synchronized arm and leg movements.
Variations and Progressions
- High Knees Jumping Jacks: Increase intensity by incorporating high knees.
- Cross Jack: Cross arms in front of your chest for added challenge.
- Speed Jacks: Perform at a faster pace for enhanced cardiovascular benefits.
Burpees
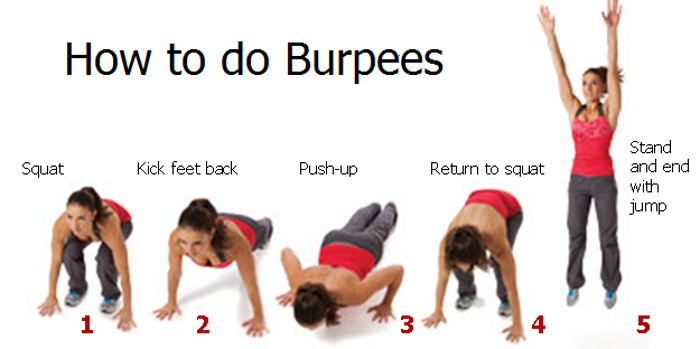
Burpees are a high-intensity, full-body exercise that combines a squat, jump, and push-up into a single movement. This challenging exercise is excellent for building strength, Exercises for losing Thigh Fat, endurance, and cardiovascular fitness. Here’s how to perform burpees correctly and the benefits they offer:
How to Perform Burpees
- Starting Position:
- Stand upright with your feet shoulder-width apart.
- Keep your back straight and your core engaged.
- Squat Down:
- Bend your knees and lower your body into a squat position.
- Place your hands on the floor directly in front of you, just outside your feet.
- Kick Back:
- Jump your feet back so that you are in a plank position with your body in a straight line from head to heels.
- Engage your core and ensure your hands are directly under your shoulders.
- Push-Up:
- Perform a push-up by lowering your chest to the ground and then pushing back up to the plank position.
- If a full push-up is too challenging, you can do a modified push-up by keeping your knees on the ground.
- Jump Forward:
- Jump your feet back to your hands to return to the squat position.
- Jump Up:
- Explode upwards from the squat position into a jump.
- Reach your arms overhead as you jump.
- Repetition:
- Perform 3 sets of 10-15 burpees. Adjust the number of sets and reps according to your fitness level.
Benefits of Burpees
- Full-Body Workout: Engages multiple muscle groups including legs, core, chest, and arms, providing a comprehensive workout.
- Boosts Cardiovascular Fitness: Elevates heart rate, enhancing cardiovascular endurance and overall fitness.
- Increases Strength and Endurance: Builds strength in major muscle groups and improves muscular endurance.
- Burns Calories: High-intensity nature of burpees helps burn a significant number of calories, supporting weight loss.
- Improves Flexibility: The movement pattern enhances flexibility in the legs, hips, and shoulders.
- Enhances Coordination and Agility: The combination of movements improves overall coordination and agility.
Tips for Proper Form
- Maintain a Straight Body Line: Keep your body in a straight line during the plank and push-up phases to avoid back strain.
- Engage Your Core: Tighten your abdominal muscles to support your lower back and maintain stability.
- Controlled Movements: Perform each phase of the burpee with control, especially during the push-up and jump phases.
Common Mistakes to Avoid
- Incorrect Plank Position: Avoid letting your hips sag or pike. Keep your body in a straight line.
- Poor Squat Form: Ensure your knees do not extend past your toes during the squat to prevent knee strain.
- Inadequate Push-Up: Perform a full push-up if possible; otherwise, use a modified push-up but ensure it’s done correctly.
Variations and Progressions
- Half Burpee: Skip the push-up phase to reduce intensity while still getting a good workout.
- Burpee with Tuck Jump: Add a tuck jump at the top for increased intensity and core engagement.
- Burpee with Dumbbells: Hold dumbbells while performing the exercise to increase resistance.
Air Cycling
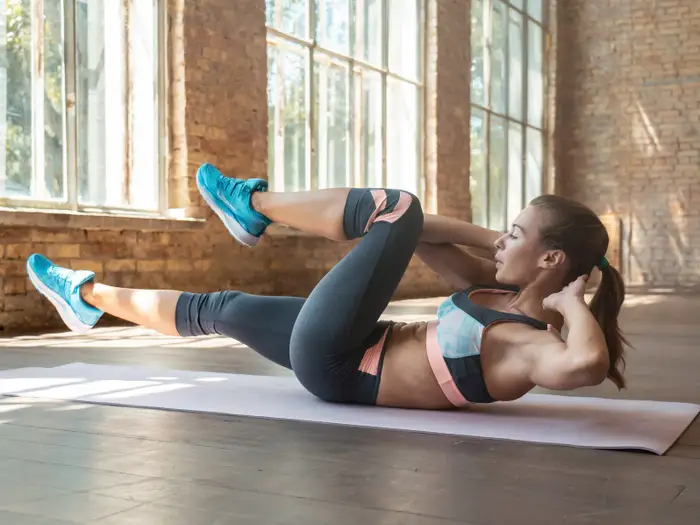
Air cycling, also known as “bicycle crunches,” is an excellent exercise for get rid of inner thigh fat, targeting the abdominal muscles, particularly the obliques. This Exercises for losing Thigh Fat and rectus abdominis. It mimics the pedaling motion of cycling while lying on your back and provides a great way to strengthen your core and improve overall fitness. Here’s how to perform air cycling correctly and the benefits it offers:
How to Perform Air Cycling
- Starting Position:
- Lie on your back on a mat with your hands placed behind your head or crossed over your chest.
- Lift your legs off the ground and bend your knees at a 90-degree angle.
- Engage your core by pulling your belly button toward your spine.
- Cycling Motion:
- Extend your right leg out while simultaneously bringing your left knee toward your chest.
- As your right leg extends, twist your torso to bring your right elbow toward your left knee.
- Switch legs and arms, extending your left leg and bringing your right knee toward your chest while twisting your torso to bring your left elbow toward your right knee.
- Repetition:
- Perform the cycling motion for 30-60 seconds or aim for 20-30 alternating leg movements. Adjust the duration and number of sets based on your fitness level.
- Breathing:
- Breathe deeply and steadily throughout the exercise. Exhale as you twist and engage your core, and inhale as you return to the starting position.
Benefits of Air Cycling
- Strengthens Core Muscles: Effectively targets the abdominal muscles, including the rectus abdominis and obliques, helping to build a strong core.
- Improves Flexibility: Enhances flexibility in the hip flexors and lower back due to the cycling motion.
- Enhances Balance and Stability: Strengthens the core, which is crucial for maintaining balance and stability in other exercises and daily activities.
- Boosts Cardiovascular Endurance: Engaging in this exercise helps elevate heart rate and improve cardiovascular fitness, especially when performed in a high-intensity interval training (HIIT) format.
- Supports Weight Loss: As a bodyweight exercise, it contributes to overall calorie burn, which supports weight loss and fat reduction when combined with a balanced diet.
Tips for Proper Form
- Keep Your Lower Back Pressed to the Floor: Ensure that your lower back stays in contact with the mat to avoid strain and engage the core effectively.
- Avoid Straining Your Neck: Use your hands for support behind your head but avoid pulling on your neck. Keep the movement controlled and focus on the core engagement.
- Maintain a Steady Pace: Perform the cycling motion at a steady, controlled pace to maximize effectiveness and reduce the risk of injury.
Common Mistakes to Avoid
- Overarching Lower Back: Avoid allowing your lower back to lift off the ground. This can put strain on your back and reduce the effectiveness of the exercise.
- Pulling on the Neck: Do not use your hands to pull on your neck. This can lead to neck strain and discomfort.
- Fast and Erratic Movements: Perform the exercise with controlled, smooth motions to effectively engage the core and prevent injury.
Variations and Progressions
- Slow Air Cycling: Perform the exercise at a slower pace to focus on muscle engagement and form.
- Weighted Air Cycling: Hold a light weight or medicine ball while performing the exercise to increase resistance and challenge your muscles further.
- Reverse Bicycle Crunches: Lie on your back with legs extended straight and perform the same cycling motion while lifting your hips off the ground.
Side-Lying Adduction
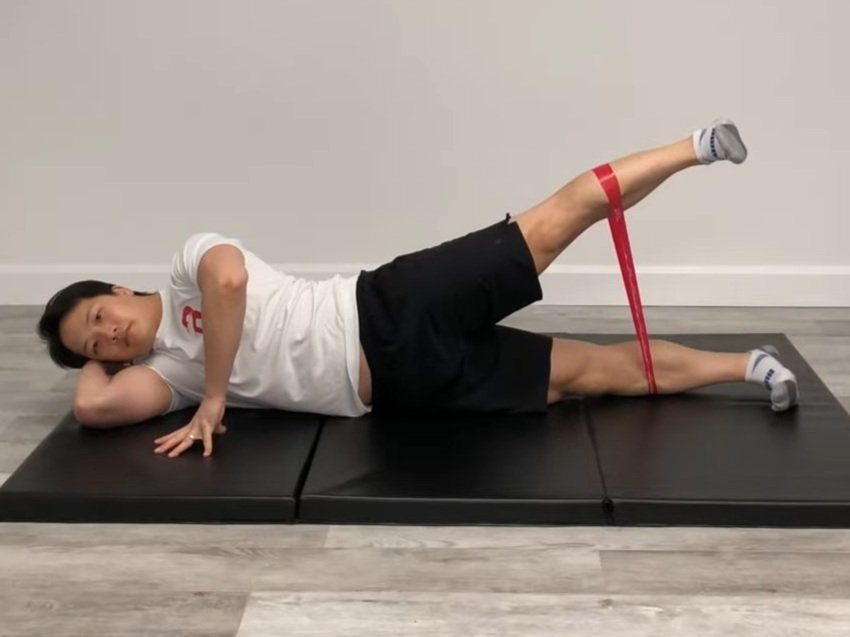
Side-lying adduction is an effective exercise for targeting the inner thigh muscles, specifically the adductors. This Exercise is beneficial for losing Thigh Fat ,strengthening , losing Thigh Fat and toning the inner thighs and improving overall lower body stability. It’s a low-impact move that can be incorporated into various fitness routines. Here’s how to perform side-lying adduction correctly and the benefits it offers:
How to Perform Side-Lying Adduction
- Starting Position:
- Lie on your side on a mat or soft surface, with your legs extended straight and stacked on top of each other.
- Support your head with your lower arm, and place your upper arm on the ground in front of you for balance.
- Keep your body in a straight line from head to heels, and engage your core.
- Leg Movement:
- Lift your top leg up toward the ceiling as high as you can while keeping it straight.
- Slowly lower the top leg back to the starting position.
- Perform the movement in a controlled manner, focusing on the contraction in the inner thigh.
- Repetition:
- Perform 3 sets of 12-15 reps on each side. Adjust the number of sets and reps based on your fitness level.
- Breathing:
- Inhale as you lower your leg and exhale as you lift it.
Benefits of Side-Lying Adduction
- Strengthens Inner Thigh Muscles: Primarily targets the adductors, helping to build strength and muscle tone in the inner thighs.
- Improves Hip Stability: Enhances hip stability and alignment by strengthening the muscles responsible for bringing the legs together.
- Enhances Balance and Coordination: Strengthening the inner thigh muscles contributes to better balance and coordination in lower body movements.
- Supports Joint Health: By building strength around the hip joint, side-lying adduction can help improve joint stability and reduce the risk of injuries.
- Low-Impact Exercise: Suitable for all fitness levels, including beginners, and those recovering from injuries due to its low-impact nature.
Tips for Proper Form
- Keep Your Core Engaged: Maintain a tight core throughout the exercise to support your lower back and keep your body aligned.
- Control the Movement: Perform the leg lift and lower in a slow and controlled manner to maximize muscle engagement and prevent swinging.
- Align Your Hips: Ensure that your hips remain stacked and do not rotate during the exercise to maintain proper form.
Common Mistakes to Avoid
- Overarching the Back: Avoid letting your lower back arch excessively. Keep your torso in a straight line to prevent strain.
- Using Momentum: Do not use momentum to lift your leg. Focus on using your inner thigh muscles to perform the movement.
- Not Engaging Core: Ensure your core is engaged throughout the exercise to support your lower back and maintain stability.
Variations and Progressions
- Weighted Side-Lying Adduction: Place a light ankle weight on your top leg to increase resistance and challenge your muscles further.
- Side-Lying Adduction with Hip Flexion: Add a slight bend to the top leg at the knee to increase the range of motion and engage different muscle fibers.
- Side-Lying Leg Circles: Combine leg lifts with small circular movements to further engage the inner thigh muscles and improve flexibility
Lifestyle Tips for Faster Results
In addition to exercise and diet, making certain lifestyle changes can help accelerate your results.
Staying Active Throughout the Day
Incorporate more physical activity into your daily routine. Simple changes like taking the stairs instead of the elevator, walking during breaks, and avoiding prolonged periods of sitting can make a big difference.
Importance of Sleep
Ensure you get 7-8 hours of sleep per night. Proper rest is crucial for recovery, maintaining a healthy metabolism, and supporting overall well-being. Best Exercises for losing Thigh Fat.
Managing Stress
High stress levels can lead to weight gain and make it harder to lose fat. Practice stress-relief techniques such as meditation, deep breathing exercises, or yoga to keep stress levels in check.
Conclusion
Best Exercises for losing Thigh Fat in a week requires dedication, and a healthy diet. While significant changes in just a week may be challenging, you can kickstart your journey and see noticeable improvements. Consistency is key, and by integrating these habits into your healthy lifestyle, you can achieve long-term success in reducing thigh fat.
FAQs
Can you really lose thigh fat in a week?
While significant Exercises for losing Thigh Fat be difficult in a week, you can see some improvements and kickstart your journey with the right approach.
How much cardio should I do daily to lose thigh fat?
Aim for at least 30 minutes of cardio daily, such as running, cycling, or jumping rope, to burn calories and reduce fat.
Are there specific foods that target thigh fat?
No single food targets thigh fat specifically, but a balanced diet rich in lean proteins, fruits, vegetables, and whole grains can support fat loss overall.
How important is hydration in losing thigh fat?
Hydration is crucial as it helps maintain metabolism, supports overall health, and can aid in feeling full, preventing overeating.
Can I continue this plan beyond a week?
Absolutely! Continuing this plan will help you achieve and maintain your desired results. Consistency is key to long-term success.
